Git is a free and open source version control system. Its branching model allows for easily trying out ideas and making changes in isolation before merging work together. Its use provides numerous benefits;
- Try out ideas and changes in isolation.
- Store previous versions of code without cluttering the working directory with copies of the same file.
- Easily collaborate with others and share code.
The Git repository itself is a collection of files within a .git/ folder in the project directory which tracks changes made to other files. Git is used locally on the development machine, but often the local repository is linked to a remote repository which can be hosted on a site such as GitHub.
Throughout this guide we will use the Git CLI (command line interface). Windows users can use the Git CLI by opening either Windows Command Prompt or PowerShell. Linux users should use their preferred terminal emulator (I like Konsole).
Installing on Linux
Git is typically available through most Linux distributions’ default package management tool. For example, on a debian based distribution such as Ubuntu 21.04, Git can be installed with apt.
$ sudo apt install git-allInstalling on Windows
Windows users may be more comfortable downloading the Windows Git executable and following the GUI (graphical user interface) provided to complete installation. Having navigated to the download page, you can select the appropriate version (32 or 64 bit) for your system and once the download is complete, double click the .exe file to begin installation.
Alternatively, you can use the Windows package manager winget to install Git by opening command prompt or PowerShell and running;
$ winget install --id Git.Git -e --source wingetFirst Time Setup
If this is the first time you have installed Git on your system there is some additional set-up to perform. The good news is that this set-up is only required for the first installation and settings persist between upgrades. If you do decide to update any of the settings in the future, you can simply rerun the commands.
Your Username and Email
Your username and email are included in all of your commits. We can set them up easily enough on both Windows (use command prompt or PowerShell) or Linux (use your preferred terminal).
$ git config --global user.name "Your Name"

$ git config --global user.email your_email@example.com
Choosing a Text Editor
When Git requires a text input, whilst making a commit for example, it will use the systems default text editor unless we specify another. For Windows users, not setting a default editor can be problematic, and often leads to failed commits.
Instructions for using specific editors are readily available online, but the simplest option for Windows is to use notepad.
$ git --global config core.editor notepadLinux users are often spoiled for choice when it comes to text editors, with multiple options included as standard with most distributions. I like nano.
$ git --global config core.editor nanoYour Default Branch Name
In recent years many organisations (including GitHub) have moved away from using ‘master’ as a branch name, instead preferring ‘main’. If you wish to adopt this approach you can specify the default name to be used.
$ git config --global init.defaultBranch mainUsing Git
Many tools exist for using Git, often providing a more visually interactive experience. However, we can gain confidence and build a better understanding of what is going on under the hood, by using Git from the command line. I highly recommend doing so for beginners and experienced users alike.
Surprisingly few commands are actually required to take advantage of much of Git’s functionality, and conveniently, using Git is largely the same on both Windows and Linux, making it easy to switch between the two platforms.
There are two ways you will commonly start working with a Git repository; initialising it locally or cloning (copying) one that already exists.
The following examples use a repository hosted on GitHub, named ‘git_demo’, which initially contains only a README file. If you want to follow along and try out the commands you can create your own repository containing a blank README file.
To create a repository on Github;
- Login to GitHub
- Click on your profile icon in the top right of the page
- Click ‘Your repositories’
- Towards the top right of the ‘Your Repositories’ page, click the big green button ‘New’
- Type ‘git_demo’ the ‘Repository name’ field
- Optionally complete the ‘Description’ field
- Select the appropriate tick-box to make the repository private
- Select the ‘Add a README file’ tick-box
- Click ‘Create repository’
Initialising a Repository
If you already have a project locally that you want to start using Git for, or if you want to create a new project with Git, the first step is to identify the projects current or intended location.
We can set this location as our working directory on both Windows and Linux using the cd command.
$ cd "/path_to_directory/"Information: When using file paths in the command line, quotes (`"` or `'`) are not required. However, if your file path contains spaces you will need to wrap the path with quote marks. One way to avoid potential issues is to avoid using spaces in file or directory names.
Once we are in the directory we want to use for our project, we can run the git init command.
$ git initOur project directory now includes a .git folder and is ready to start using right away. If the project directory already contained some files when you ran git init you need to add and commit those files just like any that you go on to create. The add and commit commands are covered below.
Cloning a Repository
Information: A secure and efficient way to interact with GitHub is to use the Secure Shell Protocol (SSH). Guidance on setting up an SSH connection to GitHub is covered under Setup an SSH Connection to GitHub.
The first step is to identify the location we want to clone the remote repository to. We can then set this location as our working directory on both Windows and Linux using the cd command.
$ cd "/path_to_directory/"Having set our working directory and navigated to a repository that we want to clone from GitHub, we can click the green ‘Code’ button found toward the upper right of the page and choose from the links provided under the ‘HTTPS’, ‘SSH’, and ‘GitHub CLI’ tabs.
We will be using the HTTPS link, which we can click to copy it to our clipboard.

We use the git clone command along with our HTTPS link to create a local copy of the repository.
$ git clone https://github.com/jrh-dev/git_demo.gitThe clone command creates a new folder containing the repository in our current working directory. The default behaviour is for the folder to be named after the repository being cloned, though you can specify a different name for the new repository folder if preferred, by passing your preferred choice after the HTTPS link.
$ git clone https://github.com/jrh-dev/git_demo.git renamed_git_demoTo interact with the cloned repository we use cd to move into the directory that was created.
$ cd "git_demo"We can now use the git status command to get an overview of the state of files within our repository.
When we run git status we see that we’re currently on the main branch, up to date, and as we haven’t yet done anything we have nothing to commit.
$ git status

On branch main
Your branch is up to date with 'origin/main'.

nothing to commit, working tree clean
Branches
Branching is Git’s self declared ‘killer feature’.
Creating a new branch allows us to easily (and quickly) make a copy of our project and start working on it independently from the original branch or any other branches that exist.
Imagining a repository with a single branch, ‘main’, a user can create a new branch and start working on adding some new functionality. A second user can create their own branch from ‘main’ and begin working on their own additions.
Each user can make changes without affecting the work of the other and when ready, both branches can merge back into the ‘main’ branch.
More advanced usage often sees collaborators performing code reviews of each others work before individual contributions are merged into the main branch with the process forming an integral part of quality control.
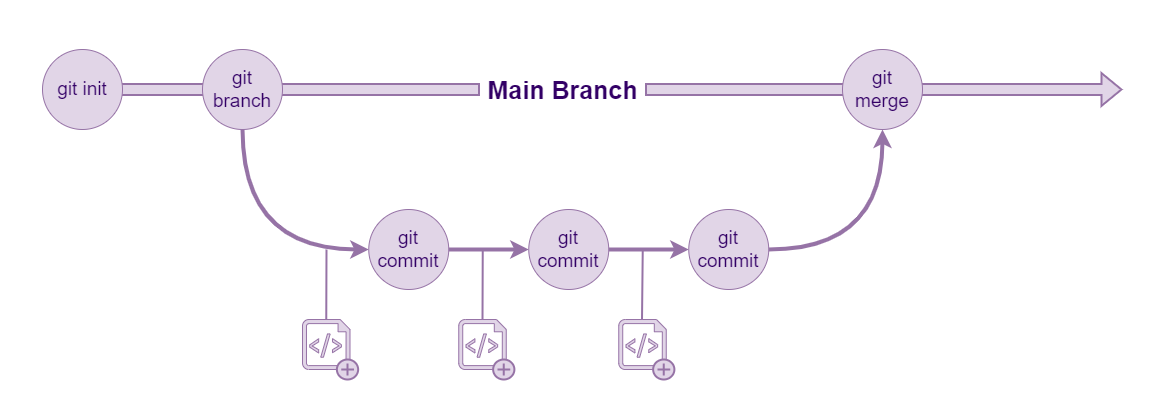
A basic Git workflow.
main is currently the only branch in our repository. We can use the git branch command to add a new branch named new_branch_1. The new branch is created as a mirror image of the branch we are in currently, in this case main.
$ git branch new_branch_1However, if we run git status again, we see that we are still on main.
$ git status

On branch main
Your branch is up to date with 'origin/main'.

nothing to commit, working tree clean
We can move to the new branch using git checkout.
$ git checkout new_branch_1

Switched to branch 'new_branch_1'

$ git status

On branch new_branch_1
nothing to commit, working tree clean
Thankfully, we can avoid a few steps by creating a new branch and checking it out simultaneously using git checkout with the -b option, which does both.
$ git checkout -b new_branch_1

Switched to a new branch 'new_branch_1'
Switching Branches
We can switch between branches at any point, however, we have to do something about any uncommitted work we have in the current branch before we can switch.
The simplest approach is often to just ensure everything has been committed. However, if there is a reason why you don’t want to make a commit you can use git stash. This is as simple as running the command git stash, at which point you can switch branches. When you later return to the branch you run git stash apply to retrieve the changes that were stashed previously.
If we want to view all the branches available we can use git branch.
$ git branch

* main
  new_branch_1
Changes - Staging and Committing
We only have one file, README.md, in our repository so far. Let’s add some code.
We are going to be coding with R and we want our project to be well organised, so we will create a directory named ‘R’ to contain our scripts. We can create the new ‘R’ directory with the mkdir command.
$ mkdir RWe can use any text editor or even an IDE to create and write our scripts. But for ease on this occasion, lets create my_code_1.R within our R directory using notepad (Windows) or nano (Linux).
Windows
$ notepad R/my_code_1.RLinux
$ nano R/my_code_1.R
Information: Typically, you will write code inside an IDE (Integrated development environment) like Rstudio or text editor like VS Code. Once you have initialised or cloned a repository you can work on the project with your preferred tools, adding and changing files and sub folders, before returning to the command line to continue with git operations (commit, merge, etc).
When we run git status our new script my_code_1.R now shows up as an untracked file.
$ git status

On branch new_branch_1
Untracked files:
(use "git add <file>..." to include in what will be committed)

    R/my_code_1.R
To start tracking my_code_1.R, we use the git add command. git add accepts a directory or file name. When used with a directory, it also adds all files within that directory.
$ git add R/my_code_1.RRunning git status again shows my_code_1.R listed under ‘changes to be committed’.
$ git status

On branch new_branch_1
Changes to be committed:
  (use "git restore --staged <file>..." to unstage)
        new file:   R/my_code_1.R
We can go on to make further changes to ‘my_code_1.R’.

Perhaps a little surprisingly, running git status now shows ‘my_code_1.R’ listed under ‘changes to be committed’, and ‘Changes not staged for commit’.
$ git status
On branch new_branch_1
Changes to be committed:
  (use "git restore --staged <file>..." to unstage)
        new file:   R/my_code_1.R

Changes not staged for commit:
  (use "git add <file>..." to update what will be committed)
  (use "git restore <file>..." to discard changes in working directory)
        modified:   R/my_code_1.R
When we ran git add my_code_1.R previously, it staged my_code_1.R, meaning it is ready to be committed. The subsequent changes we made to my_code_1.R have not been applied to the version we staged earlier.
If we ran git commit now, the version of my_code_1.R as it existed when we last ran git add would be committed. But the subsequent changes would remain unstaged.
If we want to commit the most recent changes to my_code_1.R and the previous ones. We need to first run git add again.
$ git add R/my_code_1.R

$ git status

On branch new_branch_1
Changes to be committed:
  (use "git restore --staged <file>..." to unstage)
        new file:   R/my_code_1.R
We’re now ready to commit our staged changes using git commit. Running the command will open the default editor so that we can add a commit message. However, to avoid opening an editor we can pass the -m option alongside git commit.
$ git commit -m "added code to print 'hello world'"

[new_branch_1 9ab1516] added code to print 'hello world'
 1 file changed, 3 insertions(+)
 create mode 100644 R/my_code_1.R
A final run of git status now shows that we have a clean working tree with nothing to commit.
$ git status

On branch new_branch_1
nothing to commit, working tree clean
Pushing
Everything we have done so far since cloning the repository has taken place on our local machine. For our changes to appear in the GitHub repository we need to use git push.
The new branch we created locally doesn’t exist in the remote repository yet, so if we run git push we get an error.
$ git push

fatal: The current branch new_branch_1 has no upstream branch.
To push the current branch and set the remote as upstream, use

    git push --set-upstream origin new_branch_1
As the error message helpfully suggests we can resolve this by running git push with the --set-upstream options followed by the remote (‘origin’) and branch (‘new_branch_1’) names which creates the branch on the remote and pushes our work.
$ git push --set-upstream origin new_branch_1

Enumerating objects: 5, done.
Counting objects: 100% (5/5), done.
Delta compression using up to 6 threads
Compressing objects: 100% (3/3), done.
Writing objects: 100% (4/4), 398 bytes | 398.00 KiB/s, done.
Total 4 (delta 0), reused 0 (delta 0), pack-reused 0
remote:
remote: Create a pull request for 'new_branch_1' on GitHub by visiting:
remote:      https://github.com/jrh-dev/git_demo/pull/new/new_branch_1
remote:
To github.com:jrh-dev/git_demo.git
 * [new branch]      new_branch_1 -> new_branch_1
Branch 'new_branch_1' set up to track remote branch 'new_branch_1' from 'origin'.
If we visit our repositories page on GitHub we can now have a message at the top of the page encouraging us to compare and submit a pull request for our new branch.
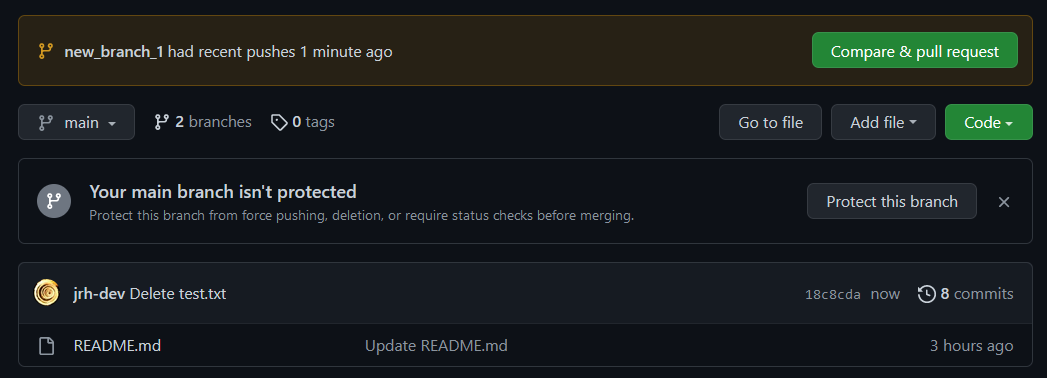
Merging
Merging is the term for joining Git branches together. When using Git to work collaboratively it is common to utilise the hosting site’s (GitHub for example) features to create a Pull Request which can then be reviewed by peers before a merge takes place to join two branches.
However, it is also possible to perform merges locally. To merge our branch ‘new_branch_1’ into the ‘main’ branch we first switch to ‘main’ using git checkout.
$ git checkout main

Switched to branch 'main'
Your branch is up-to-date with 'origin/main'.
We then use git merge to complete the merge.
$ git merge new_branch_1

Updating 10746f5..9ab1516
Fast-forward
 R/my_code_1.R | 3 +++
 1 file changed, 3 insertions(+)
 create mode 100644 R/my_code_1.R
Following a merge, we can return to new_branch_1 using git checkout and resume working on that branch.
Merge Conflicts
When trying to merge two branches that have been worked on simultaneously we may encounter a merge conflict.
We can introduce a merge conflict by creating a new file named R/my_code_2.R, containing a single line of code print("hello, world"), in our main branch.
$ git checkout main

Switched to branch 'main'
Your branch is up-to-date with 'origin/main'.

$ git nano R/my_code_2.R

$ git add -A  # note that add -A stages all changes

$ git commit -m "added my_code_2"

[main 25379d1] added my_code_2
 1 file changed, 1 insertion(+)
 create mode 100644 R/my_code_2.R
We can then switch to new_branch_1 and create another file named added my_code_2, but containing a different line of code print("world, hello").
$ git checkout new_branch_1

Switched to branch 'main'
Your branch is up-to-date with 'origin/main'.

$ git nano R/my_code_2.R

$ git add -A

$ git commit -m "my_code_2 added"

[new_branch_1 e0c4691] my_code_2 added
 1 file changed, 1 insertion(+)
 create mode 100644 R/my_code_2.R
Both our main and new_branch_1 branches now contain a file named R/my_code_2.R but the files in each branch have different contents.
If we switch back to main and try to use git merge to merge new_branch_1 we now have a conflict.
$ git checkout main

Switched to branch 'main'
Your branch is ahead of 'origin/main' by 2 commits.
  (use "git push" to publish your local commits)

$ git merge new_branch_1

Auto-merging R/my_code_2.R
CONFLICT (add/add): Merge conflict in R/my_code_2.R
Automatic merge failed; fix conflicts and then commit the result.
As the message suggests, Git hasn’t been able to automatically complete the merge. We now need to resolve the conflict. We can get some further detail by running git status.
$ git status

On branch main
Your branch is ahead of 'origin/main' by 2 commits.
  (use "git push" to publish your local commits)

You have unmerged paths.
  (fix conflicts and run "git commit")
  (use "git merge --abort" to abort the merge)

Unmerged paths:
  (use "git add <file>..." to mark resolution)
        both added:      R/my_code_2.R

no changes added to commit (use "git add" and/or "git commit -a")
We can open the file my_code_2.R in our default editor to begin the process of resolving the conflict.
The code between <<<<<<< HEAD and ====== is the version in our current (checked out) branch main.
The code between ====== and >>>>>>> is the version in our ‘new_branch_1’ branch.
To resolve the conflict, we typically choose one version and delete the other (we also delete the <<<<<<< HEAD, ======, and >>>>>>>). However, in this case we want the script to print “hello, world” and “world, hello” (for some reason), so we want to keep the code from both versions. We can simply delete the <<<<<<< HEAD, ======, and >>>>>>>.
Once we have addressed our merge conflict we need to stage and commit the amended file.
$ git add R/my_code_2.R

$ git commit -m "merge conflict resolved"

[main fb526cd] merge conflict resolved
We don’t need to use git merge again as Git automatically detects that we have fixed the conflict and continues the previous merge. Running git status confirms everything is ok.
$ git status
On branch main

Your branch is ahead of 'origin/main' by 4 commits.
  (use "git push" to publish your local commits)

nothing to commit, working tree clean
Pull
When using Git to collaborate there may be times when the remote repository contains work which you don’t have locally. We can incorporate changes from the remote repository using git pull, with changes going into our current branch.
$ git pullIf our local branch is behind the remote branch the default behaviour is for our local branch to ‘fast-forward’ to match the remote branch.
If our local and remote branches have diverged we can use git pull with the --rebase option. I added a small conflict between the local and remote repositories in the README.md file.
$ git pull --rebase

Auto-merging README.md
CONFLICT (content): Merge conflict in README.md
error: could not apply 88d9fc3... commit t1
hint: Resolve all conflicts manually, mark them as resolved with
hint: "git add/rm <conflicted_files>", then run "git rebase --continue".
hint: You can instead skip this commit: run "git rebase --skip".
hint: To abort and get back to the state before "git rebase", run "git rebase --abort".
Could not apply 88d9fc3... commit t1
We can resolve this conflict in the same way as described under the Merge Conflicts section above. We open the README.md file in our default editor and decide which parts to keep before staging and committing the file, and finally run git rebase --continue.
$ git add README.md

$ git commit -m "fix pull merge conflict"

[detached HEAD 9559625] fix pull merge conflict
 1 file changed, 3 insertions(+)

$ git rebase --continue

Successfully rebased and updated refs/heads/main.
The .gitignore File
The .gitignore file specifies patterns that are checked against file and sub-directory names in your repository and these are then ignored. We can create the file using a text editor like notepad or nano. Comments can be added using # and each line should denote one pattern.
# History files
.Rhistory
.Rapp
.history

# Session Data files
.RData
.RDataTmp

# User-specific files
.Ruserdata
Secrets
Accidentally committing secrets to the repository is one of the major risks when using Git, especially if your repository is publicly available. Secrets can be a number of things including user names, passwords, ssh keys, API keys, and datasets. Caution should be taken to exclude files that contain secrets using the .gitignore file. Ideally the code should never contain hard coded secrets.
If a secret is committed to a repository then steps should be taken to mitigate the damage at the earliest opportunity. It is not sufficient to simply change or delete the file as the history retained by Git will still expose the secret.
In the event that you find yourself in this situation seek advice from an advanced user.
Next Steps
Still need convincing? Check out the fantastic Git for Humans talk.
Want a great resource tailored towards data scientists and R users? Can’t go wrong with Happy Git and GitHub for the useR.
Despite its simplicity, Git is an incredibly powerful tool. The excellent Pro Git book is essential reading.